This blog post refers to Elementor’s custom post setup using Crocoblock’s JetEngine. It can be implemented similarly in other types of custom posts, as the most important element is the ability to detect a user’s IP and connect it to a meta field or taxonomy in a custom post. In this example, we will display a listing grid based on the user’s location. Please note that this differs from the Geo Search option in the Query Builder in JetEngine. That functionality only allows you to create a radius around a static address and is not related to displaying custom post based on the visitor’s location.
Step 1 - Install Plugins

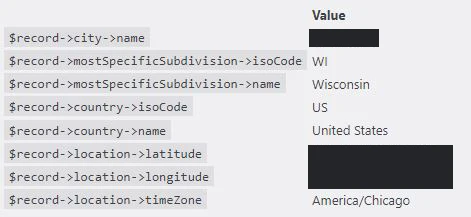
We assume you’re already working with Elementor Pro and have the Jet Engine plugin installed. An important part of being able to detect the user’s current location by their IP is a geolocation plugin. Please note that the plugin will detect city, state, and deliver latitude and longitude but these are not the exact locations of the user but their IP-provided location. We’ve chosen to work with the Geolocation IP Detection plugin but there are other WordPress plugins that perform a similar task. The accuracy of this plugin highly depends on the data source provider you choose. You can select free options but based on our testing, they don’t deliver very good results. We decided to use paid service – Ipstack Web API (it is very affordable). The results are accurate and this is a reliable source for IP geolocation.
Step 2 - Create a Custom Post
In our example the Custom Post Type is called “Properties” and we will be using a taxonomy as a base for the geolocation. We are going to filter the listing grid using “State” as a location reference, but you can do it utilizing the city parameter. The same setup can be used for Events, Concerts, Ticket Sales, Movies, and many other applications when the listing grid results shown should be in the closest proximity to the user.
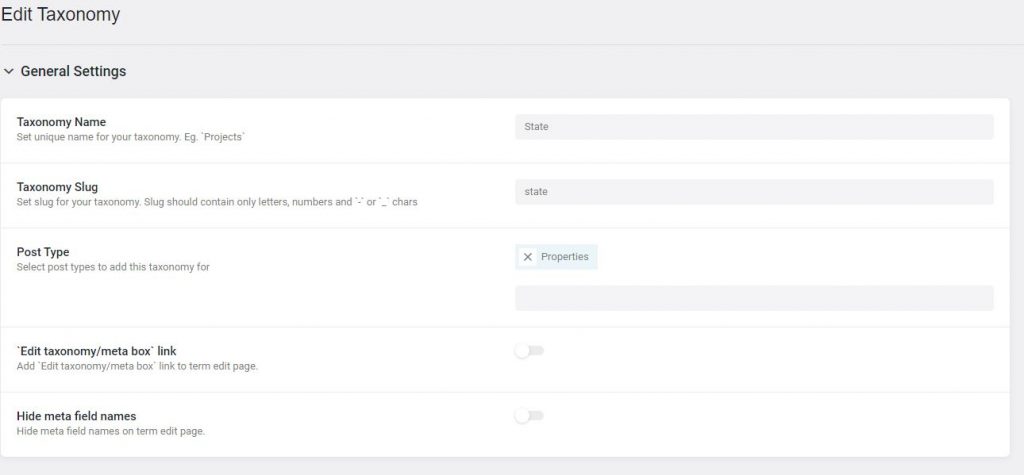
Step 3 - Create a Taxonomy or a Meta Filed that will Match the Geo field.
You will have to create a field that will serve as a reference field for your listing grid and match one of the location fields from the IP locator. This can be the city, state, state abbreviation, country or lat and long.
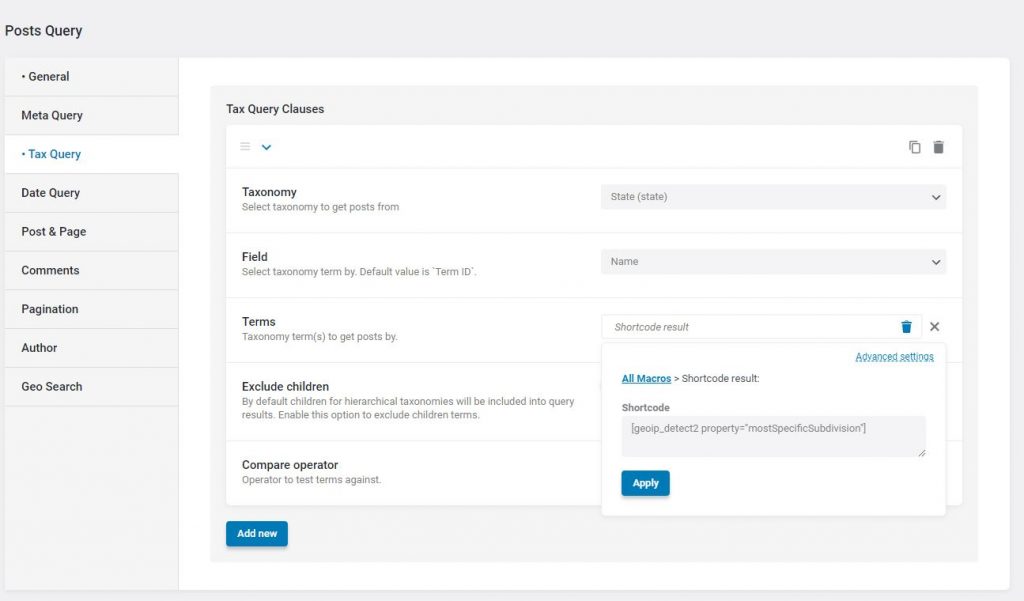
Step 4 - Build a Custom Query
Using a Query Builder we will build a custom query that we will then use to sort our Listing Grid. Our plugin utilizes shortcodes but since it’s dynamic data, we are going to use Shortcode Result to turn the data into a static element that then can be compared to out existing taxonomy or a meta field. The field we are using is state and it’s reference in the IP locator is “mostSpecificSubdivision”. If you are referencing a city, just replace it with “city”.
[geoip_detect2 property="mostSpecificSubdivision"]
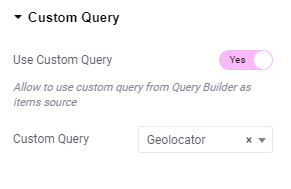
Step 5 - Sort your Listing Grid using the Query you've created.
The last step is to add the query builder to your listing grid. Our custom query is called Geolocator but pick whatever you named your query. Put it into action and see it work. Check from various locations to verify that the shortcode is working correctly.
Also, create a fallback listing grid for those that don’t fall into your taxonomy or meta-field entries.
We have been looking for this solution for quite some time and we’re happy to share it with the Crocoblock and jetEngine community. We hope you will be able to utilize it and deliver a better user experience for your site’s visitors.